Resize Font Size using your Mouse!!
I will keep this article simple. No picture, no video.
Well, maybe you know that if you want to change the size of your fonts, you would need to go to Control Panel, then bla bla bla.. ( I won't elaborate on this as I am about to tell you a faster way).
This is the faster way:
- Press your 'Ctrl' button on your keyboard
- Then using your Mouse WHEEL, scroll it up to make the size smaller or scroll it down to make it bigger.
- Done
Simple.
Some useful websites that I visited often have really small fonts and it looks even smaller in my small-sized laptop. This trick keeps my eyes from tiring.
Tips: If you use a mouse with no wheel, sorry dude, I suggest you to get the one with wheel. (This is not really a tip, huh? ;p)
Done. As promised, no picture, no video. Hope this helps you.
Feel free to bookmark this article.
On Screen Keyboard: The solution to your aging Keyboard
This morning I came across a question in Yahoo.Answer that urged me to post this article. The question says that the asker can't use the 'print screen' button to capture an image from his computer.
There could be a lot of reasons to this problem, and I went on to answer him and said he might want to try the 'on screen keyboard (OSK)' to check if his keyboard button is damaged. Hopefully he has solved his problem now.
Well, back to the topic. You can actually activate OSK to do everything your physical keyboard would do. So, it is very helpful if you find out that some buttons of your keyboards are damaged. For instance, your CapsLock or your NumLock button.
To do this, here are the steps:
- Open Run. You can either search for 'Run' in search box or press 'Windows + R' (Tips: It's always good to memorize the shortcuts right?? refer to my previous post on this)
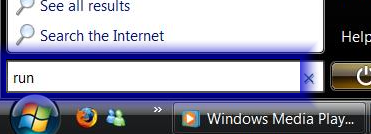
- The Run window will pop up. Type 'Osk'.
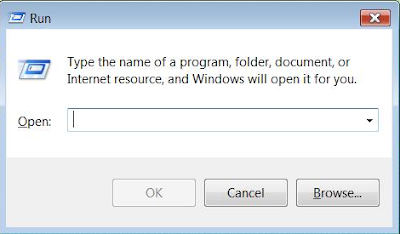
- After clicking OK, you will see the OSK will appear. Now you can use it.
- To exit, just close it.
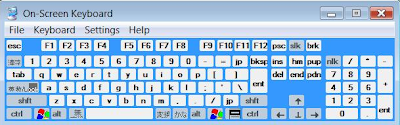
Tips: You can customise it by changing the setting. You can make it always on top, set it to be standard keyboard, etc.
Here I made this video, showing what you have just read to help you understand better.
Hope this helps, pal.
Feel free to bookmark this article ;p
Make your own Keyboard Shortcut for your Favorite
As discussed in my previous post, Vista assigns specific Keyboard Shortcuts for certain operations. However, Vista allows you to create one by yourself!!
What you need to do is to follow these simple steps:
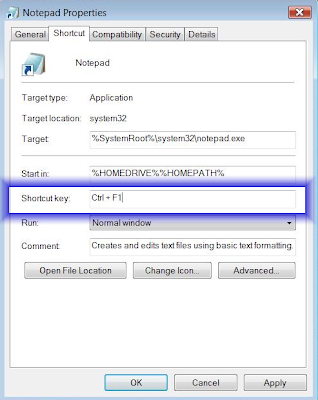
- Select a Shortcut of your favorite program. Here, I use an example of using Notepad shortcut on my desktop
- Right click on your selected icon
- Click Properties

- Under 'Shortcut' tab, look for the 'Shortcut key' box.
- On your keyboard press the shortcut you want it to be. However, not all buttons can be used. Here are the options:
- F1-F12 or Numpad Key
- SHIFT + (F1-F12 or Numpad Key)
- CTRL + (F1-F12 or Numpad Key)
- (CTRL + ALT or CTRL + SHIFT or ALT + SHIFT) + Almost any key
- Click OK once you are done
Tips: It is always good to jot down the shortcuts if you are starting to make some, just in case you forget them. Yet, using it often enough will make you memorize them even faster.
This is really helpful as it would save you a lot of trouble by searching and looking for the shortcut of your favorite programs. Try it!!
This is my short video, demonstrating what you have just read. Enjoy.
Hope this helps.
Keyboard Shortcut: Time Saver
Here are some keyboard shortcuts specific in Vista, that I find very useful in saving time. Try to use it often, and you will be able to memorize it with minimum efforts.
- WINDOWS KEY + E - Open Windows Explorer **
- WINDOWS KEY + F - Open Search **
- WINDOWS KEY + U - Open the Ease of Access Center
- WINDOWS KEY + R - Open the Run Window **
- WINDOWS KEY + (1-9) - Run the nth program on your Quick Launch bar **
- WINDOWS KEY + Pause - Open System Properties
- CTRL + SHIFT + ESC - Open Windows Task Manager
- ALT + F4 - Close the Active Window **
- ALT + TAB - Switch to Previous Active Window
- WINDOWS KEY + TAB - Flip 3D **
- CTRL + WINDOWS KEY + Tab - Persistent Flip 3D
- ALT + ESC - Cycle Through all Open Windows
- WINDOWS KEY + T - Cycle through Taskbar Applications
- WINDOWS KEY + M - Minimize all Open Windows
- WINDOWS KEY + Shift + M - Undo all Window Minimization
- WINDOWS KEY + D - Toggle Desktop Focus **
- WINDOWS KEY + B - Shift focus to the System Tray
- WINDOWS KEY + Space - Shift focus to Sidebar **
Those with double asterisks are shortcuts that I use really often, and I ensure you, they help me saving time and keeping things simple.
Hope this helps. Happy Pressing!! ;p
Tips: Do you know you can also create a keyboard shortcut for you favorite programs?? Click here to find out how.
Feel free to bookmark this article ;p
Knowing Keyboard Shortcut will make your Life much EASIER..
Windows Vista assigns keyboard shortcuts to programs and documents on your Quick Launch bar. It's really easy to use it.
Tips: Just use the WINDOWS key + the NUMBER of the program in the order it appears on your Quick Launch Bar.

The image below is my quick launch bar. So here, the order of my programs is:
- Firefox
- Windows Live Messenger
- Windows Media Player
- Show Desktop
- etc etc
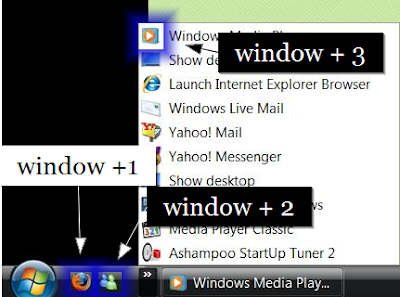
So, in order to use this short cut, press the WIN button + the sequence NUMBER of the programs.
I use this shortcut a lot, especially when I just start my laptop. I always open my homepage using Firefox, listening to some of my favorite musics and chat with my friends. So, what do I do? I press Windows button with my thumb, hold it while pressing 1,2 and 3 in sequence. What a simple method.
Tips: You can change the order of the programs by simply "drag and drop" it.
For this post, I thought it's easily understood and I decided not to create a video demonstrating it.
Hope this helps you friends.
See you on my next post
Feel free to bookmark this article ;p
Exclude Files form appearing in your search results
Tips: Modifying your index system in this manner will help to speed up slightly your search and also use less space in your hard disk.
Vista manages and updates an index of all your files silently. The Index stores information such as file names and tags to make your files easier and faster to find when you type a search clue in to the search box.
However, this index will also include many files you may not want to appear in searches.
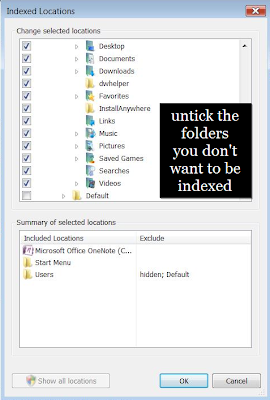
To exclude them from being indexed, here are the steps:
- Go to Control Panel, then click on Indexing Options
- A new window will then pops up, showing you what is indexed. Pressing the Modify button followed by the Show all Locations button in the window that then appears will allow you to exclude files and folders
- Untick the folder locations for private files and other locations that contain files you will not want to search for
Tips: It is advisable to restart your computer before this method to take effects.
I have made a video regarding what you have just read to help you understand better, and already posted it up on my Metacafe account. Here is the embedded video. Enjoy.
Hope this help.
Tags are Important to search for files in computer
All the files stored in you computer can have tags. Tags are simply words that describe the documents and their relevance to you. You can add tags to you photos or files, for instance, Joanne, birthday, party. By doing this, you just need to go to the search box of you explorer (on the top right) or at the start menu, and type these tags. You get what you want!

Tips: There are two ways in searching for you files. One is through you search box on the top right of explorer window and the other is through the search box at the start menu.

Tags can be added through Explorer window in the following steps:- Open Explorer Windows (Tips: you can do a right click on the Start button).
- Go to any image or photo you want to tag
- After selecting, as you can see the bottom of the window contains information about the file you have just selected
- If no tags made, the text Add a tag would appear. Click on this box and you will be able to create the tags for the file

- If you want to add multiple tags to a file or files, you should separate them with a semi-colon ( ; )
Tags can also be added through Windows Photo Gallery. Here are the steps:
- Open your Windows Photo Gallery
- Select an image
- On the right side, you will be able to see the similar text Add Tags
- Type your Tags there and you are done

The next time you have so many files all over your folder file, you will find it easier if you have tags some of the important files.
Here I made a simple video, demonstrating what you have just read. Enjoy.
I hope this helps you, my readers.
Feel free to bookmark this article ;p


