20080730

Safari Apple: Private Browsing

Have your Online Activities Private with Safari

Having Safari as your browser is a wise choice if you want your online activities to be private as Safari offers a great feature: Private Browsing.

What on earth is Private Browsing?

Well, you might be one of those who always want your cookies, temporary files or history in your computer to be deleted regularly to save some space in your hard disk. The normal way to do is by
using Privacy Reset to empty your cache and clear Safari of your browsing, forms, and search history.

However with Private Browsing turned on, you are asking Safari not to store:
  1. Your Google searches
  2. Your cookies
  3. The history of sites you’ve visited
  4. Your download history
  5. Information from online forms you’ve filled out.
So, in other words, you can really have you online activities PRIVATE.

So to turn this feature on,
  1. Go to Edit
  2. Click Private Browsing
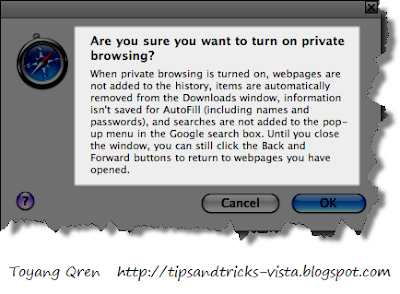
  3. A new Conformation Window will pop up, to confirm click OK.
To me, each browser has its own better features than others. Though I am using Firefox as my primary browser, I'd never been disappointed with Safari. This feature is just great thing from Safari.

Tips:f you’ve been browsing without private browsing turned on, just use Privacy Reset to empty your cache and clear Safari of your browsing, forms, and search history.

Hope this helps.

Software: Texter Text Substitution

How to Use Texter: Text Subtsitution

Do you use email (with signature) a lot? Do you write repetitive words again and again? Or, are you a student (just like me!) who needs to write projects with a lot of repetitions of texts? If your answers are ‘yes, yes, yes’ then this article is absolutely beneficial for you!

Before I go on telling you about Texter, I would like to thank Adam Pash (Senior Editor of Lifehacker) who first wrote a review about this great software. I will put a link to his original article at the end of this article for your further reference. So if you find this article useful, go give a tap on his back and say thanks to him! I am a great fan of Lifehacker by the way.

Well, back to the topic. This text substitution software will definitely save you lots of time as it will replace your repeated words with your own ‘hotstrings’. Let’s say, for instance, I write emails to my friends and my family and at the end of my emails, I always write my signature. With this software, now I can easily create my own hotstrings to replace the long-and-tiring-to-write-again-and-again signature with simple hotstrings.

To give you a better understanding, here is my own video to describe it. Adam Pash has his own video too.


So, how to use this great application?

  1. To download you can click here (this will bring you to Adam’s Pash page)
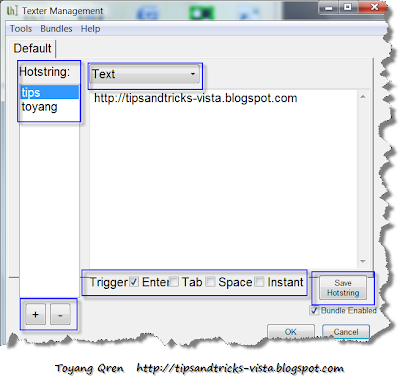
  2. Open your Texter, choose Text. To create a hotstring, click the + button on the bottom left.
  3. A new window will appear, type your hotstring, and the replacement words.
  4. Do not forget to save it. Done!

As someone who use repetitive words quite often, this software is a great tool for me really.

Hope this helps.


20080729

Internet: Find IP Address

3 Simple Ways Finding your IP Address

In case you are wondering what IP address is, the following are the definitions by Microsoft and Wikipedia respectively:

Short for Internet Protocol address. An IP address identifies a computer that is connected to the Internet or a network. An IP address usually consists of four groups of numbers separated by periods, such as 192.200.44.69.
An Internet Protocol (IP) address is a numerical identification (logocal address) that is assigned to devices participating in a computer network utilizing the Internet Protocol for communication between its nodes. The role of the IP address has been characterized as follows: "A name indicates what we seek. An address indicates where it is. A route indicates how to get there."

Have you ever wondering what your IP address is? IP address is getting more and more important in the Internet nowadays. For instance, your IP address is what Google will see if you try to click you Adsense ads by yourself, and it is what Google use to get you banned!

So, to find your IP address, here are 3 simple ways to do just that.

Control Panel

As I am using Vista, the first method is based on Vista system (Xp users read second method). Here are the steps:
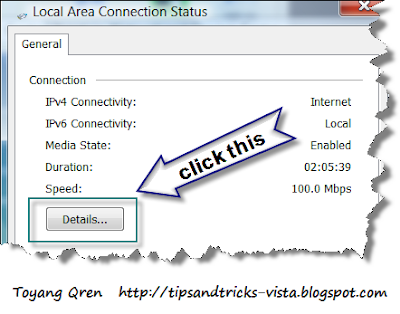
  1. Go to Control Panel, Open Network and Sharing Center.
  2. Under Connection, click View status.
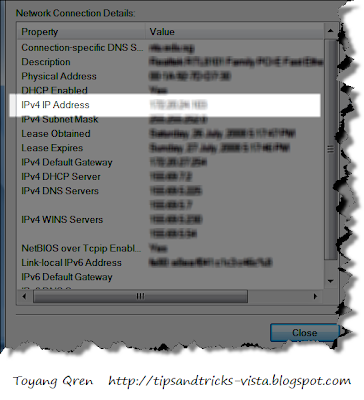
  3. Click Details. Your computer's IP address appears in the Value column, next to "IPV4 IP Address."


Using Command: IPconfig

This method can be used for both vista and xp. However the images you will see are based on Vista as I captured the pictures when I am running Vista.

So, this is the how-to.
  1. First, open Run from your Start Menu. (tips: you can search it first using search box, this is why vista is powerful in searching files inside you computer).
  2. Type cmd.
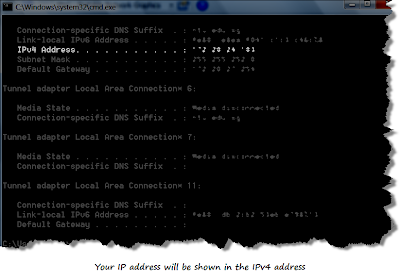
  3. A black window will appear. Relax, you are not messing up your computer, what you need to do is to type: ipconfig.
  4. You will see you ip adress under ipv4 (for vista).
Google Desktop

If you have installed Google Desktop from Google, then I believe this is the easiest way to find your IP address. This is so as there are one or two gadgets that once added to your sidebar, will immediately show the IP address of you computer. Fast isn't it?
  1. If you do not have Google Desktop, you can download it here.
  2. Open you sidebar if you dont start it at the start up.
  3. Add gadget to you sidebar by clicking the + button on top of your sidebar or by clicking the gadgets tab on your task bar, then click Add gadgets. Then a new window listing variety of gadgets will be displayed.
  4. Then search for IP address, and you will see this window. Click the one you want to add to your sidebar.
  5. Once added, you will see the gadgets on your sidebar. The image below is what I have when I choose the first gadget.

Hope this helps.

20080726

Google Trends: Compare Searches

Analyze Google Searches using Google Trends

Google Trends is Lab product of Google that analyze a part of Google web searches to compare and compute how often certain searches have been done for the terms you enter.


The appearance of Google Trends, in general, include Search Volume Index graph, News volume graph, and displays of tops regions, cities and languages in which people searched for the first term you entered.

The Search Volume Index Graph is a display that shows you how often searches have been done, relative to the total number of searches done on Google over time.


Below the Search Volume Graph, you will find the News Reference Graph. This graph will show you how often the topic appear in the Google News story. When a spike is detected on the graph, it labels the graph and display the headlines of an automatically selected Google News story written near the time of that spike.


Below the Search and News Graph, the Google Trends displays the tops regions, cities and languages.

Some tips using Google Trends:


  1. Google Trends allows you to compare either search words or website.
  2. Google Trends will let you compare up to FIVE terms, each term separated by a comma. For instance, if you want to compare words like vista, xp, windows and millennium, type this: vista, xp, windows, millennium
  3. To limit your search, you can apply the general searching tips (When you use any of these tips (quotation mark, minus signs or vertical bars) Trends will only display the Search Volume Index Graph):
    1. To restrict the result, use QUOTES around the term you are searching for. For example: "Barrack Obama" (if you do not put the quotes, by default, Google will look for any words of barrack and obama in any order).
    2. To exclude certain words, you can use minus (-) sign. For example, If I am looking for Chelsea (the English football club), and I do not want to see any result about Chelsea Clinton (yes, the daughter of Bill), I will type: "chelsea" -clinton.
    3. To see how many searches contain either terms, list them and separate with a vertical bar (|). For example: AVG|Avast.
  4. Sometimes you notice that you see ZERO results for one of you search terms, this is so because the terms doesn't have sufficient search volume to be displayed. Or, it is also possible that the terms is negligible compared to the others.
  5. The cool thing about this is that you can export the data for you own purpose. It can be exported to a .csv file, which can be opened in most spreadsheet applications.
For more details you can look at Google Help website.

Hope this helps.


20080725

Real Player: Download Video

Download a Video using Real Player 11

Now, we are going to show you another powerful way of downloading almost all type of videos in the Web. Not by using Keepvid, Downloadhelper or Safari browser. It is by using Real Player 11.

From RealNetworks:
RealPlayer 11 gives you the ability to download videos from thousands of Web sites with just one click.

Here are the brief steps:
  1. Open your Real Player 11. Download it here if you haven't done so.
  2. Go the the Menu bar, and select Tools -- Preference. a
  3. Under Download and Recording tab in the left, check the Enable Web Downloading and Recording and set the folder where the downloaded videos are saved. a
  4. When you open a page where a video is playing, you will see the small rectangle for you to click for downloading. a
  5. Then the RealPlayer Download and Recording Manger will appear. a
Out of those I have reviewed regarding ways of downloading a video, this method is my favorite as downloading now is a matter of a click. Simple, yet powerful.

Hope this helps.

20080724

Google: General Search Tips

8 General Searching Tips using Google for Better Results

You might be using Google.com as a search tool everyday, just like me. To give the best result in terms of accuracy and relevance, you might be surprised that Google can do much more than just a simple search.


In this article, I will share what Google have in their site: the 8 general searching tips for Google.com.


1. Exact Phrase (using QUOTE, " ")

If you are looking to find an exact words, rather that a collection of words that might not be relevant to you search, put quotes around your search query. Here, if I want only to look for Chelsea Football Club (yes, that Premier League club), not any CLUB (your animals lovers club?) or any FOOTBALL (your kicking ball?) or any CHELSEA (your friend?), I would write it in this manner: "Chelsea football club".


2. Synonyms (~). Stemming (+). Excluding (-)

You can look for wider range of words by include (~) to indicate you are looking for the synonyms of the word too. For example, ~seminar would include words like training and workshop. By stemming (+), you are telling google that the word is a must-have word(s). Writing +"marketing skills" simply means you want to see the phrase in your search result.
The symbol (-) means to exclude certain words you don't want. Here, as you are looking for a seminar, you prefer not to see any book about marketing skills.


3. Site:

This will search only pages which reside on this domain. This is a very specific way of searching and it really helps to give you a better result. Lets say, you know that you are looking for a music video of Good Charlotte, called The River in Youtube.com. Rather than going to Youtube.com, and then type Good Charlotte The River, you can open Google.com (which hopefully is you homepage) and type 'good charlotte the river site:youtube.com'. Smart way of doing it, isn't it?

Important: note that there is NO space after the colon.


4. Related:

This will show all pages or websites that Google finds to be related to the URL you type in the search box.


5. Link:

This will display a list of all pages which Google has found to be linking to your site.


6. Spell:

It will run a spell check on the word(s) you type.


7. Define:

It will display definitions for words, phrases, and acronyms from the Web.


8. Weather:

It shows the weather in a particular city you specify. Here, I type: 'weather:Singapore' to ask Google to show the weather in Singapore.


Look for the Advanced Searching Tips for Google in my next post. Meanwhile, you can read our article on How to Customize your Google page.

Hope this helps.

20080722

Create Transparent Background using Paint.NET

Create Transparent Background using Paint.NET

Sometimes, you need to insert a pictures or images with no background colors, or in other words, to have
transparent background.

Using Paint.NET, you do this quite simply.

Here are the steps you need to follow.

  1. Open your Paint.NET (if you don't have it, you can download it here for free).
  2. Open the image you want to edit.
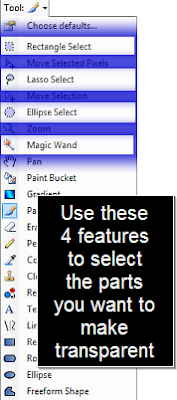
  3. At the left side, choose Magic Wand (this is to select parts you want to make transparent).
  4. Then choose the Tolerance as 0%.
  5. Next, click the place you want to make transparent. Once selected, press delete. (tips: if the color of the background are the same, it is easier to delete. If the background include various colors, you will need more work to delete. Refer to my video then you'll understand.)
Watch this tutorial video to understand better.


Tips: Other than using Magic and, you can use other features to select (refer to image below).


Hope this helps.
Set a Password to Open Document, Workbook or Presentation

In the 2007 Microsoft Office, you can set and use passwords to help prevent other people from opening Microsoft Office Word 2007 documents, Microsoft Office Excel 2007 workbooks, and Microsoft Office PowerPoint 2007 presentations. This feature is useful if you create important document that you don't want others to read, especially when you share your computer with others.

So this is how to do it.
  1. Click the Microsoft Office Button Button image -- Prepare -- Encrypt Document.
  2. In the Password box, type a password, and then click OK. Tips: It is important for you remember your password. If you forget, Microsoft cannot retrieve it. Store the passwords that you write down in a secure place away from the information that they help protect.
  3. In the Confirm Password dialog box, in the Reenter password box, type the password again, and then click OK. This is to reconfirm your password.
  4. Save your password.

Here is a tip from Microsoft about password:

Use strong passwords that combine uppercase and lowercase letters, numbers, and symbols. Weak passwords don't mix these elements. Strong password: Y6dh!et5. Weak password: House27. Passwords should be 8 or more characters in length. A pass phrase that uses 14 or more characters is better.
To give you a better idea about how to do it, here is my tutorial video.


Here are some screen shots..


Hope this helps.


20080719

Download a ' Difficult' Video using SAFARI

I guess most of you are masters in downloading a youtube-like video, be it from Youtube, Google Video, Metacafe, or the like. To do this, you can either use several ways like using DowloadHelper, Real Player or Keepvid.com (these three are my favorites)

However, there are times when videos become 'difficult'. What do I mean by this? There are certain videos that are inside a member area and open in a new-separated window. Therefore, to download this type of videos, you need a more powerful downloading method. And this answer is here: SAFARI.

To get you started, here is my video uploaded in Metacafe.com. Enjoy.


Here are the steps you need to follow:

  1. Open the page (using Safari of course) with the video you wish to download.
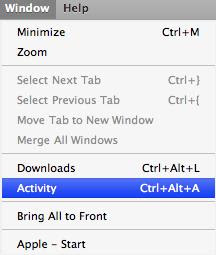
  2. Open the Activity Window, by pressing Ctrl+Alt+A (windows) or Option+A (mac) or Go to Windows on the Menu bar -- Activity, and look at the items on the activity window.
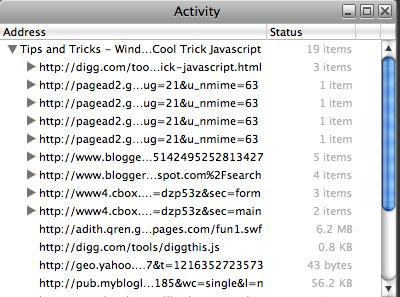
  3. Look for the page you want to download the video from. Tips: Fewer tabs you open, easier for you to find the video.
  4. Double click while pressing Crtl or Option button to download.
  5. Save to download, and rename you file (for example, get_video.flv)
Bear in mind all the extensions, mp3 -- for songs, swf and flv -- flash video, gif, png and jpg -- images, etc.

Tips: As the fewer tabs mean fewer item in the activity window to choose from, try to minimize your open tabs.

Here are some screen shots to give you better ideas.


Hope this helps.

20080718

Google: Avoid Google.com Redirection

How to Get Google.com when you type Google.com

You may have encountered this problem: when you try to type Google.com in your browser bar, what it will bring you is Google page with different domain.
Google normally redirect users in countries other than the United States from Google.com to one of their country-specific sites (e.g. www.google.co.uk for Google UK) to provide easy access to country-specific search features.

Google uses your computer's IP address, which is frequently the internet address of your Internet Service Provider (ISP), to determine your location and the corresponding Google domain.

So, what if you prefer your Google.com to appear instead?

Here are the steps you need to follow:
  1. Open Google.com. (If you already Google.com page, you can leave this page and read my other posts ;p)
  2. Click on the Google.com link on the bottom right-hand side of the Google homepage. You will go straight to Google.com. If you still at you country domain, go to step 3. (Tips: If you have cookies enabled, your browser will connect directly to Google.com on all subsequent visits).
  3. If cookies are disabled, you'll experience the same redirect each time you visit Google. You can solve this either by enabling cookies.
To enable cookies, you can click here for the details.

Here is the video illustrating it.

Alternatively, you can do this:
  1. setting a bookmark for http://www.google.com/webhp. In the latter case, you'll be taken to http://www.google.com/webhp, which is exactly the same as Google.com, each time you select the bookmark.
Hope this helps.

20080717

Internet: Enable Disable Cookies

How to Enable or Disable Cookies

Well, I thought this topic is a must-know ana rather basic for all computer users. However, I found this kind of question in YahooAnswer often enough. Therefore, I will share it with you here.

Well, what are Cookies actually? Here is a brief description of Cookies from Wikipedia:

Cookies are used for authenticating, session tracking (state maintenance), and maintaining specific information about users, such as site preferences or the contents of their electronic shopping carts. The term "cookie" is derived from "magic cookie" a well-known concept in UNIX computing which inspired both the idea and the name of HTTP cookies.

So, I think it is quite self-explanatory. Get back to the topic. To enable cookies, you need to follow the procedure in you browser you're using. (Yes, different browsers have different way of doing this).

Here are the details (I only include Firefox and IE, as these are the popular browser up to date):


Internet Explorer 7

  1. Open your IE7 from your desktop (or any way possible to get the page open, quick launch? keyboard short cut?)
  2. Go to Tools
  3. Choose Internet Options
  4. Click Privacy
  5. Move the slider to the bottom
  6. Should read Accept All Cookies, then click Apply

Internet Explorer 6

  1. Open your IE6 from your desktop
  2. Go to the Menu at the top, then click Tools
  3. Choose Internet Options
  4. Click Privacy, then Advanced
  5. Click Override automaic cookie handling
  6. Click Accept under First-party Cookies
  7. Click Always allow session cookie
  8. Click OK, then Apply

Mozilla Firefox 2.0

  1. Open your Firefox
  2. Go to the Menu at the top, then click Tools
  3. Choose Internet Options
  4. Click Privacy
  5. Under Cookies, click Accept cookies from sites
  6. Click "OK"

Safari 2.0

  1. Open Safari
  2. Go to the Menu, click Edit
  3. Select Preferences
  4. Select Security
  5. Adjacent to - Accept Cookies: Select Always
  6. Close the window

Hope this mind map would help you better (tips: click on the image see it clearer).


Hope this helps.

20080714

Internet: Cool Trick Javascript

Simple Internet Trick

Well, this post is quite off from what I have been doing all these while. This is a cool trick that you have to try when you have nothing to do or just feel bored.

Here is the instruction video.


So, lets recap.

  1. You need to open any website. (tips: the more the images, the better it is).
  2. Then you just need to copy the the JavaScript below, and paste it to the URL of the website.
  3. Press Enter and you will see the trick.
Tips: When I tried this for the first time using Firefox, it didn't work, so I thought this trick might not be compatible for the browser. However, apparently, thanks for my Metacafe viewer, if your Firefox is updated, you can use this trick using Firefox. IE works just fine.

Here is the Javascript. Just copy it and paste it in the URL.

javascript:R=0; x1=.1; y1=.05; x2=.25; y2=.24; x3=1.6; y3=.24; x4=300; y4=200; x5=300; y5=200;DI=document.images; DIL=DI.length; function A(){for(i=0; i-DIL; i++){DIS=DI[ i ].style;DIS.position='absolute'; DIS.left=Math.sin (R*x1+i*x2+x3)*x4+x5;DIS.top=Math.cos(R* y1+i*y2+y3)*y4+y5}R++}setInterval('A()', 5); void(0);

By the way, I don't create this JavaScript, all thanks to the creator, I just want to share this entertaining trick to my readers. Enjoy.


20080713

Blogger: Schedule Posts Future

Set a Date to Publish your Blogger Post in the Future

If you are not always in front of you computer everyday, yet you want to be activ
e in posting your article in Blogger, you can schedule you post to be published at the later date. This will come really handy as you can be a consistent blogger for your readers.

To do this, here is the video I've made. Please comment if you have any opinions about the video. If you don't see the flash video below in 10 seconds (I have limited bandwidth), you can click here (I uploaded the video in Metacafe.com).

Recap now.
  1. Go to your Blogger Blog, and Sign in.
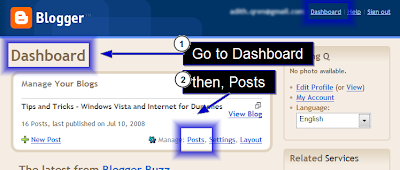
  2. Go to your Dashboard, and click Posts (look at the snap shots below).
  3. Tips: you need to have drafts in the first place. Select any draft, Edit it. (Tips: if you don't have a draft then create new! However, before you publish it, don't forget to set the date and time you want to schedule.)
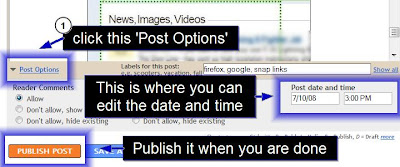
  4. In the Editing page, on the bottom left corner, click Post Options.
  5. On the right, you can now set the date you want to schedule your post fo publishing. (Tips: The date format is mm/dd/yy while the time format is hh:mm AM/PM. You have follow this format.)
Here are some screen shots I have edited..


Hope this helps.

Feel free to comment and bookmark this article.

20080710

Firefox: Open Multiple Links

Open Multiple Links using Firefox Add-On Snap Links

Do you use Google a lot? Are you an active member of social bookmarking websites like Del.icio.us or Digg? If your answers are YES, then this article is worth reading.

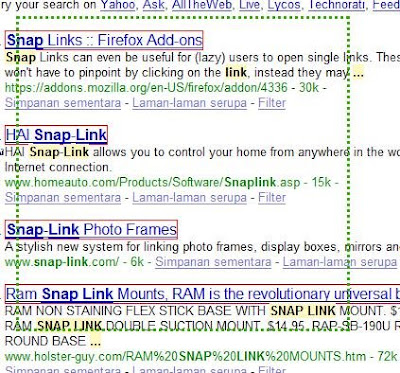
In Google search result, sometimes you want to check out the links in the result page, but it is quite time consuming and kind of tiring to open all the links one by one.. However, using Snap Links you can do it in just a click.

As usual, here is the my video as the introduction. If you don't see the flash video below in 10 seconds (I have limited bandwidth), you can click here (I uploaded the video in Metacafe.com).

So the steps that you have to follow are here:
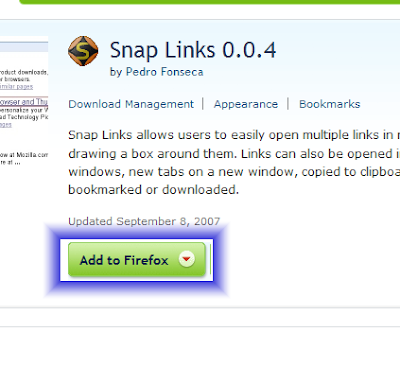
  1. Download Snap Links, Open Firefox, go to Tools -- Add-ons -- Get Extensions on the bottom right of the new window popped-up. Then search for 'Snap Links' (Tips: or you can go to Google.com, type ' Firefox Snap Links ')
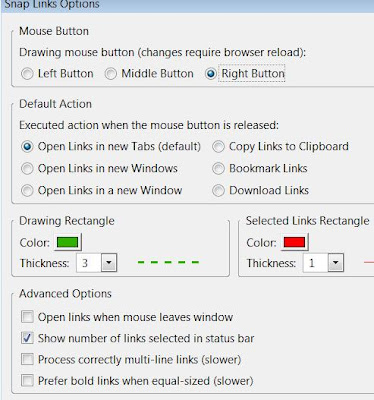
  2. After downloading and restating your Firefox, you can customize the Options, by going to Tools -- Add-on and look for Snap Links, then click Options.
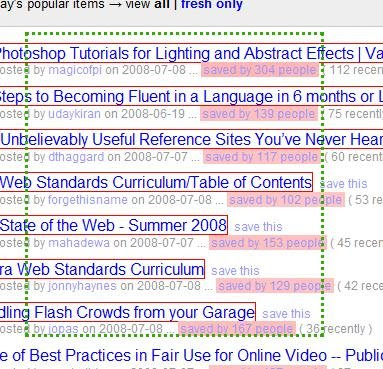
  3. If you set right click as your default, then to open multiple links, right-click you mouse and drag it over the links you want to open.
Tips: in the Options, you can set to open the links in new tab or new window.

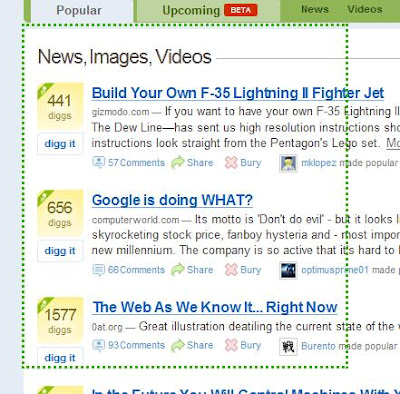
Here are some of the snapshots..


These are the examples of the uses of Snap Links. I personally use this a lot for Search Engines and websites like Digg and Del.icio.us.


Hope this helps.